From creating our preliminary task, this allowed us to learn that we needed to plan out our film opening in order for it to flow in the way we wanted to with no missing parts and bits that didnt link in or make sense to the story as it was improvised.
We decided on the genre of film that we were going to create and this allowed us to discuss ideas of locations, props and mis en scene.
Deciding on the genre first meant that we were able to find suitable locations for our opening. The research we did into films of similar genres showed that we would need to find locations with an eerie atmosphere. We chose Castlefield in Manchester as the location for the attack scene. Because of the location that we were using, we had to film during the day and therefore, the effects of darkness and the haziness to show memory had to be done during editing.
The location that we chose was quite a distance from our college and meant that we would not be able to complete the filming in lesson times as there was not enough time for travelling and then getting the work done. This meant that we had to organise a time that was suitable for the group to meet at the location so that filming could take place. This required a lot of communication between the four members.
Our preliminary task and main task has aspects of similarity and dfference. Both had the mood of anger involved. The preliminary task, from all three characters and the main task, from the character conducting the investigation.
Both tasks used a non-diagetic backing track underneath the dialogue. These sound tracks were created by using software called Logic Pro 9. This allowed up to make and mix different sounds together to match the mood and atmosphere of our film.
Monday, 2 May 2011
Friday, 1 April 2011
Filming mistakes
Throughout the editing process of our coursework, we realised that we made quite a few continuity errors during our filming. These errors were noticeable and so to make our film opening look realistic had to be changed. To do this we had to do some reshoots of footage to correct our mistakes. In some cases we were able to alter the mistakes in editing. Others we chose to use part of the footage up to the mistake and then cut to another shot.
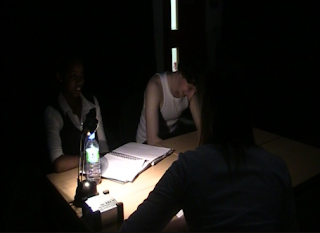
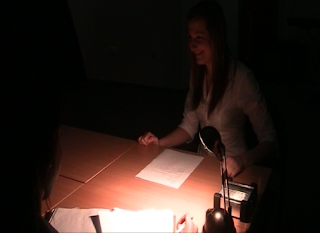
The main continuity mistake we realised we had made was during the interrogation scene. In one shot there is no water bottle on the table, just the lamp and the sound recording box. In the next shot, a water bottle appears in front of Alcione. Our first idea was to do a reshoot of this section of the film, we then found that there was an easier way to correct our mistake without having to get more footage. We decided that we would leave the bottle in the shot. We found that in Final Cut Pro 7 we could drag our footage around the viewing screen so that only the bits that we wanted to be seen were shown. To correct the mistake, we dragged the footage to make the shot focus more on Lucy. This meant that even if the bottle was on the table that it would not be able to be seen because of how the shot had been zoomed.
This image shows how we made the mistake of leaving the water bottle on the table whilst filming

This image shows how we realised the mistake we made when this shot had no water bottle on the table
This is what our shot looks like now we have corrected the image
As we were filming the corridor scene of our film opening, we struggled to get the footage we needed without getting the posters in the shot. As we filmed this in college, there are posters all over the walls with people work on them, these can not be taken down so we had to try and work our filming around them. We found that there was no way of editing these posters out on Final Cut Pro 7 so we had to do a reshoot of this scene. We decided that the only way that we would be able to keep the posters out of the shot was if we were to only show Lucy’s feet in the shot. We also decided that this would make our film opening better as it would add to the suspense of not seeing Lucy, which is what we intended on in the first place. During our reshoot we decided that we would extend the footage that we already had and instead of just having the scene in the corridor, we started the scene from the stairs. Lucy walks up the stairs and along the corridor where she then opens the door and steps into the original corridor where we only see her feet walking towards the interview room.
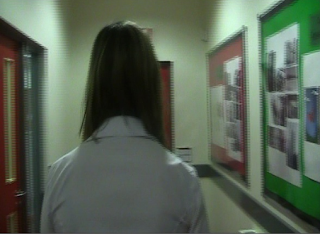
This image shows Lucy walking down the corridor with the posters clearly seen on the walls
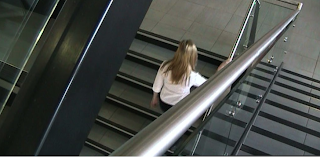
This image shows how we changed this footage and extended it to Lucy walking up the stairs
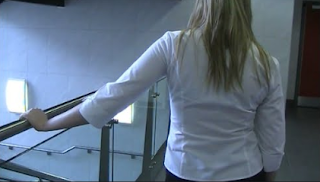
This image shows Lucy walking along the corridor with a close up of her hand on the rail

This image shows how we corrected the mistake of our footage by now only showing Lucy’s feet, posters can still slightly be seen but as we did with the footage with the bottle, we are going to drag so the poster cant be seen.
Whilst filming our footage we found that we were getting our lines wrong quite a bit, this caused us to laugh half way through the filming and therefore these shots could not be used.
Lucy saying the wrong lines
Lewis laughing
Lucy laughing
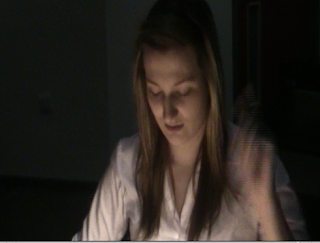
When looking through our footage during editing, we found that some of the shots we had filmed well were actually rather blurred in places. This meant that we had to cut to different shots to avoid this blur from ruining the film. We found that the worst case of this blurring in the footage was when we were doing the scene from behind the glass. We found that we were getting blurred shots and also a slight shadow because of the dark rooms.
This is the interrogation scene that we decided was to blurred to use in our film.
The main continuity mistake we realised we had made was during the interrogation scene. In one shot there is no water bottle on the table, just the lamp and the sound recording box. In the next shot, a water bottle appears in front of Alcione. Our first idea was to do a reshoot of this section of the film, we then found that there was an easier way to correct our mistake without having to get more footage. We decided that we would leave the bottle in the shot. We found that in Final Cut Pro 7 we could drag our footage around the viewing screen so that only the bits that we wanted to be seen were shown. To correct the mistake, we dragged the footage to make the shot focus more on Lucy. This meant that even if the bottle was on the table that it would not be able to be seen because of how the shot had been zoomed.

This image shows how we made the mistake of leaving the water bottle on the table whilst filming

This image shows how we realised the mistake we made when this shot had no water bottle on the table

This is what our shot looks like now we have corrected the image
As we were filming the corridor scene of our film opening, we struggled to get the footage we needed without getting the posters in the shot. As we filmed this in college, there are posters all over the walls with people work on them, these can not be taken down so we had to try and work our filming around them. We found that there was no way of editing these posters out on Final Cut Pro 7 so we had to do a reshoot of this scene. We decided that the only way that we would be able to keep the posters out of the shot was if we were to only show Lucy’s feet in the shot. We also decided that this would make our film opening better as it would add to the suspense of not seeing Lucy, which is what we intended on in the first place. During our reshoot we decided that we would extend the footage that we already had and instead of just having the scene in the corridor, we started the scene from the stairs. Lucy walks up the stairs and along the corridor where she then opens the door and steps into the original corridor where we only see her feet walking towards the interview room.

This image shows Lucy walking down the corridor with the posters clearly seen on the walls

This image shows how we changed this footage and extended it to Lucy walking up the stairs

This image shows Lucy walking along the corridor with a close up of her hand on the rail

This image shows how we corrected the mistake of our footage by now only showing Lucy’s feet, posters can still slightly be seen but as we did with the footage with the bottle, we are going to drag so the poster cant be seen.
Whilst filming our footage we found that we were getting our lines wrong quite a bit, this caused us to laugh half way through the filming and therefore these shots could not be used.

Lucy saying the wrong lines

Lewis laughing

Lucy laughing
When looking through our footage during editing, we found that some of the shots we had filmed well were actually rather blurred in places. This meant that we had to cut to different shots to avoid this blur from ruining the film. We found that the worst case of this blurring in the footage was when we were doing the scene from behind the glass. We found that we were getting blurred shots and also a slight shadow because of the dark rooms.

This is the interrogation scene that we decided was to blurred to use in our film.
Shot list
Corridor Scene
Shot One: Close up of Lucy's feet walking along the corridor
Shot Two: Camera moves from Lucy's feet up to her back in a medium shot
Shot Three: Shot of Lucy's back walking down the corridor, her face is not visible to viewer
Shot Four: Extreme close up on Lucy's hand on the door handle as she opens the door
Shot Five: Point of veiw shot of suspect on the other side of the door, watching Lucy walk in
Shot Six: Close up of Lucy's legs as she is walking through the door. Face is still not revealed
Interrogation
Shot Seven: Low angle shot from "security camera"
Shot Eight: Tracking shot of Lucy going to sit at the interview table
Shot Nine: Establishing shot of the three people at the interview table
Shot Ten: Shot reveals Lucy's face slowly in close up
Shot Eleven: Shot reverse shot as conversation begins
Shot Twelve: Establishing shot from the other side of the "one-way glass" showing the backs of people watching the interview
Shot Thirteen: Back to shot from the security camera
Shot Fourteen: Close up of Lewis's face smirking
Castle field
Shot Fifteen: Downwards tilt revealing the castlefield area from high to low
Shot Sixteen: Panning movement of the camera in establishing shot of the lower area of castlefield that we are using
Shot Seventeen: Close up of victimes phone showing a message saying "hurry up"
Shot Eighteen: High angle shot of victim walking up stairs
Shot Nineteen: Long shot revealing Lewis hiding in the trees
Shot Twenty: Point of view shot from Lewis as the victim walks into his sight, hiding ready to attack her
Shot Twenty-one: Medium shot of victim walking along the path
Shot Twenty-two: Point of view shot from Lewis showing the victims back as he follows her
Shot Twenty-three: Point of view shot Lewis as the victims turns round and sees him
Shot Twenty-four: Camera changes to point of view shot as victim is being strangled and camera shakes
Shot Twenty-five: shot of the victim being thrown down a hill
Shot Twenty-six: of Lewis speaking in the interrogation room
Shot Twenty-seven: back to castlefield revealing the victims dead body lay on the flood
Tuesday, 8 March 2011
Location Shots
Here is a list of some different locations that we are going to be using for our film opening. We have decided to use four different locations to make the opening more interesting and exciting.
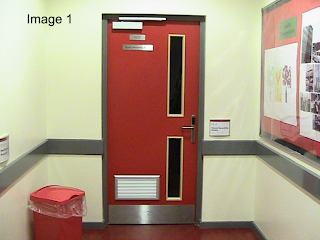
Image of the door that Lucy will be walking through into the interview room.
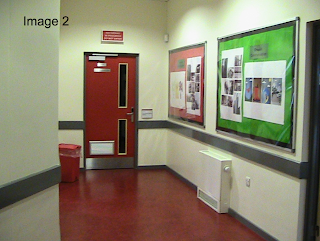
This is the end of the corridor leading up to the door that we will see Lucy walking down.

This is another angle of the corridor showing a longer view that we will do a shot of Lucy's feet from.
The first location that will be introduced is the corridor. At the moment the corridor is quite bright with a red door and colourful posters. The posters will be easy for us to take down but the door would still be an issue. To overcome this problem we are going to change the colour of the door altering the contrast and saturation during the editing process. We decided that this would be a good location to use because it is a long enough corridor to walk down to record our footage, but not too long that it would take to long to walk down and take up too much recording time. The corridor slightly bends round a corner, which makes it a good thing because it allows us to change the direction of filming where the corner turns. As we are going to be filming in the corridor with limited light, we are hoping that the colours of the walls will not be as intense and so we will not have to make as many adjustments. If this does happen and the colours are still as bright, we will cover the walls with dark paper, making the corridor look as dark and sinister as we can. Another way that we are going to try and overcome the issue of the colours is to try and keep as many of the shots as we can close ups. This will stick to the theme of how other scenes in our chosen genre are shot.
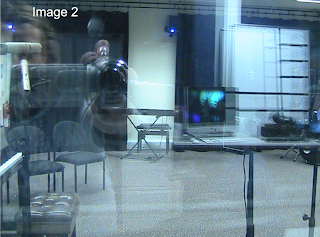
This is a shot from behind the glass, it shows the reflection of the person taking the image. This will have to be carefully positioned to not get the reflection of the camera during filming.
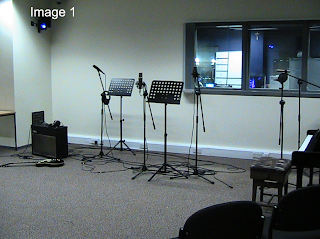
This is the recording studio that we are going to be using as the interview room.

This is the other side of the recording studio behind the window that we are going to use as one way glass.
As the interrogator walks through the door, we are introduced to our second location, the music recording room in our college. We have chosen this room because it appears to be a large and empty room, which is perfect for what we want the location to look like. The equipment in the room will be removed from the area we are going use where we will set up 2 tables and 3 chairs for our interrogation scene. The window in the room will be used as a one-way mirror, a popular prop used in interrogation scenes.
All the lights in the interrogation room and the room on the other side of the glass will be switched off. The only source that we are going to use will be a table lamp in the interrogation room. The door that leads to the recording room from the corridor has a window that allows light in. To prevent light from coming into the room, all the curtains around the music recording room will be drawn to cover the walls, and the door.
To create the CCTV camera shot, the camera will be placed on a table whilst on the tripod, which we found is at the same level as our college security cameras so this should look quite effective. During editing a hazy, distorted filter will be used over the footage. A date and time will be added at the bottom of the screen to make it more realistic.
The third location that we will be using in college will be from the other side of the glass in the editing suite of the recording studio. We want this to appear as though it is one-way glass so we can do a point of view shot showing the interrogation scene. When taking our location shots, we have found that it is going to be difficult to film this without getting a reflection. After discussing the problem, we decided to film
from different angles keeping the camera out of sight to avoid getting a reflection.
We realise that we are not going to be able to keep the shadow of the person out of the shot, but to make it less noticeable, we are going to zoom in on the window so that less of the surrounding area can be seen and giving it a greater appearance of an interrogation scene.
We have looked at a few existing interrogation scenes and we have found that in most of them there is a slight reflection on the glass therefore we are not taking this as a major issue.
Tuesday, 1 March 2011
Analysis of storyboard
Here is an analysis of the storyboard we drew out to plan for our film opening with an explaination of what is happening in each picture. We are only going to show the first 8 pictures as we feel this gives a good idea of what is happening. We expect this sequence to last around 1 minute 30 seconds.

Our first shot will be a tracking shot of Lucy walking down the corridor. We have decided that we are only going to show the lower body in the shot as we believe that this will build up suspense as we do not want the face of the person being revealed yet. We are also going to use a static camera on the floor showing the footsteps down the corridor which will show the direction of the characters movement. We are going to have natural lighting so it is not to bright and not too dark. We don't want any music in this part of our opening as we want the sound of the footsteps being made on the floor is more defined. Lucy will be wearing smart clothes with shoes that make a loud noise when walking. The mis-en-scene will be a plain corridor with no colour on the walls. It will be very simple. We will expect this shot to last for around 10 seconds.

For our second shot, we are going to do a wide shot of the door, showing only the back of Lucy as we still do not want to reveal her face. The shot will show the full door and the full of the back of her body. Again we are going to have natural lighting. In this shot, the sound will begin to build up. We are going to introduce a quiet soundtrack that will begin to build up suspense for the door being opened. Again the mis-en-scene will be plain not very colourful. This shot is expected to last around 5 seconds.

For our third shot we are going to use an extreme close up of Lucy's hand grabbing hold of the door handle and turning it to open it. We have decided to use an extreme close up as this shows that this is a key point building up suspense. Again we are going to use natural lighting to stick with the theme. The music in the previous will continue and get progressivly louder as the door handle is turned.

For our fourth shot, we are going to introduce the inside of the interogation room so we meet two of the characters. The room will be dark with low key lighting so although the characters can be seen, their faces are not fully clear. We still do not want to reveal the other character (Lucy) yet and therefore, the other two characters in the room can only see a shadow of her from the door. The character that is being interogated (Lewis) will be wearing a vest shirt and jeans to show that he is not well kept and to give him the criminal appearence. The other character which is the criminals lawyer (Alcione) will be wearing smart clothes similar to Lucys; suit style clothes. The mis-en-scene of the room will be very plain and kept dark to build up the suspense.

For our fifth shot we are going to have a static camera and apply a filter to the camera. We want it to appear as if it is an actual camera in the interogation room, recording the interview from a security camera. We are going to have the time and date in the corner of the screen to give the true effect of a security camera. There will be no sound in this shot as we want the suspense to build up. We see Lucy walking through the door and Lewis and Alcione sat at the desk. We still do not reveal Lucys face as we still want the suspense to be building up.

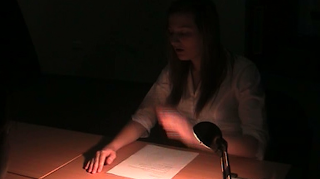
Our sixth shot is when we finally see Lucys face. She walks to the table and sits down with the other two characters. There will be a wide shot of the three sat at the desk. The lighting will be low key with the only source of light being from the desk lamp. There will also be a tape recorder on the table. The only sound we will use here is a small amount of dialogue from Lucy directed at Lewis.

For our seventh shot we are going to use a point of view shot from what will appear as one way glass to add to the effect of it being an interview room. It will show what is happening in the room. The lighting again will be low key, still with only the desk lamp providing the light. The view of the scene will be rather limited and the dialogue will be muffled and not well heard to give the effect that it is being recorded and passed through to the room behind the one way glass.

Our eighth shot is an establishing shot of Castlefield where we are going to film the murder scene. It is going to have natural lighting from the outdoor environment and ambient sound in the background, such as wind, traffic noises, dogs barking. The area in Castlefield that we are going to use is a field area with dips in the ground and a path. There is also a tall brick wall which we will be using for the murder.

Our first shot will be a tracking shot of Lucy walking down the corridor. We have decided that we are only going to show the lower body in the shot as we believe that this will build up suspense as we do not want the face of the person being revealed yet. We are also going to use a static camera on the floor showing the footsteps down the corridor which will show the direction of the characters movement. We are going to have natural lighting so it is not to bright and not too dark. We don't want any music in this part of our opening as we want the sound of the footsteps being made on the floor is more defined. Lucy will be wearing smart clothes with shoes that make a loud noise when walking. The mis-en-scene will be a plain corridor with no colour on the walls. It will be very simple. We will expect this shot to last for around 10 seconds.

For our second shot, we are going to do a wide shot of the door, showing only the back of Lucy as we still do not want to reveal her face. The shot will show the full door and the full of the back of her body. Again we are going to have natural lighting. In this shot, the sound will begin to build up. We are going to introduce a quiet soundtrack that will begin to build up suspense for the door being opened. Again the mis-en-scene will be plain not very colourful. This shot is expected to last around 5 seconds.

For our third shot we are going to use an extreme close up of Lucy's hand grabbing hold of the door handle and turning it to open it. We have decided to use an extreme close up as this shows that this is a key point building up suspense. Again we are going to use natural lighting to stick with the theme. The music in the previous will continue and get progressivly louder as the door handle is turned.

For our fourth shot, we are going to introduce the inside of the interogation room so we meet two of the characters. The room will be dark with low key lighting so although the characters can be seen, their faces are not fully clear. We still do not want to reveal the other character (Lucy) yet and therefore, the other two characters in the room can only see a shadow of her from the door. The character that is being interogated (Lewis) will be wearing a vest shirt and jeans to show that he is not well kept and to give him the criminal appearence. The other character which is the criminals lawyer (Alcione) will be wearing smart clothes similar to Lucys; suit style clothes. The mis-en-scene of the room will be very plain and kept dark to build up the suspense.

For our fifth shot we are going to have a static camera and apply a filter to the camera. We want it to appear as if it is an actual camera in the interogation room, recording the interview from a security camera. We are going to have the time and date in the corner of the screen to give the true effect of a security camera. There will be no sound in this shot as we want the suspense to build up. We see Lucy walking through the door and Lewis and Alcione sat at the desk. We still do not reveal Lucys face as we still want the suspense to be building up.

Our sixth shot is when we finally see Lucys face. She walks to the table and sits down with the other two characters. There will be a wide shot of the three sat at the desk. The lighting will be low key with the only source of light being from the desk lamp. There will also be a tape recorder on the table. The only sound we will use here is a small amount of dialogue from Lucy directed at Lewis.

For our seventh shot we are going to use a point of view shot from what will appear as one way glass to add to the effect of it being an interview room. It will show what is happening in the room. The lighting again will be low key, still with only the desk lamp providing the light. The view of the scene will be rather limited and the dialogue will be muffled and not well heard to give the effect that it is being recorded and passed through to the room behind the one way glass.

Our eighth shot is an establishing shot of Castlefield where we are going to film the murder scene. It is going to have natural lighting from the outdoor environment and ambient sound in the background, such as wind, traffic noises, dogs barking. The area in Castlefield that we are going to use is a field area with dips in the ground and a path. There is also a tall brick wall which we will be using for the murder.
Tuesday, 15 February 2011
Production Treatment- Resume
Title
Infatuation complex
Genre
We have chosen Physiological Thriller as the genre for our film. We did research into existing films and found that we liked and preferred the aspects of this type of film. Our enjoyment in this genre of films encouraged our choice.
Target Audience
Our research into this chosen genre has allowed us to find the target audience for this particular genre. Therefore we have decided on young males aged 15-24 as our target audience. It may also appeal to some females who like this genre of film.
Costumes
The costumes that will be used will be similar to costumes worn in an real interrogation scene. Lucy and Alcione will both wear formal clothes, such as a white shirt and black pants, and if possible with a suit style jacket. We believe this fits best with the stereotypical investigator uniforms. For Lewis' character, we decided he would wear a plain white vest, with a slight dirty look and worn out jeans. This will give him the appearance of being a rugged and scruffy character.
Props
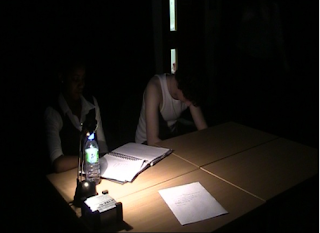
The props used in our film opening will be kept at a minimum. We have decided that Lucy’s and Alcione's characters will both have a pen and paper to give the effect of a real interview scene. On the table will be a small box, which we will be using as a voice recorder to record the interview between the three characters.
A table lamp will be used as the only source of light. We want to keep the room quite dimly lit to create suspense.
Locations
Our first location will be the music recording studio in our college. We chose this because the big space gives us an opportunity to transform it into an interview room, once all of the recording equipment is moved out of the way.
The other main location that we will be using is Duke Place and Duke Street in Castlefield. This is where the murder scene will take place.
Interrogation scene
The opening of the scene will be Lucy walking down the corridor and towards the door. During this scene, there will be a variety of camera shots, movements and angles. Different parts of her body will shown, all except her face. The camera will focus on her feet walking towards the door and then a shot from behind her. We want this to create suspense and anticipation without seeing her face until she is in the room. When Lucy reaches the door, she will open it and walk in. When she is in, the camera will be used as a security camera inside the room in a top corner. A green filter will be placed over the lens of the camera. A time and date will be placed in the left bottom corner whilst editing to achieve the full security camera effect. Lucy's character is going to be very angry because the victim was her sister. Her sister has been reported missing and she believes that the suspect knows where she is, though Lucy does not know that her sister is dead. As Lucy sits at the interview table her face is revealed to the camera. Shot reverse shot will be used showing Lucie at a low angle shot, suggesting that she has more status than any other characters. Lewis will be shown at a high angle.
Murder scene
This part of the film opening will take place in Castlefield between Duke Place and Duke Street. We are going to be using a series of shots as flashback scenes. Lewis will be doing a voice over narration during the flashback scenes, explaining what is going on. We are going to cut between the Castlefield scene and the interrogation scene at key points for effect. The victim is going to be walking down a path in Castlefield, oblivious to the fact that the murderer is following her. We will cut to the murderers point of view, following the victim down the path, watching her as she walks. The camera will be hand held at this point to create the effect of a point of view show from suspect. The camera will cut to the victim again showing the suspect running after her.
To create a good shot of the victim being attacked, the camera will be hand held and sharp, quick movements will be used. After the attack, the victim is then thrown into a ditch. Here we will cut back to the interrogation scene and we will see the suspect’s arrogant smirking face.
Infatuation complex
Genre
We have chosen Physiological Thriller as the genre for our film. We did research into existing films and found that we liked and preferred the aspects of this type of film. Our enjoyment in this genre of films encouraged our choice.
Target Audience
Our research into this chosen genre has allowed us to find the target audience for this particular genre. Therefore we have decided on young males aged 15-24 as our target audience. It may also appeal to some females who like this genre of film.
Costumes
The costumes that will be used will be similar to costumes worn in an real interrogation scene. Lucy and Alcione will both wear formal clothes, such as a white shirt and black pants, and if possible with a suit style jacket. We believe this fits best with the stereotypical investigator uniforms. For Lewis' character, we decided he would wear a plain white vest, with a slight dirty look and worn out jeans. This will give him the appearance of being a rugged and scruffy character.
Props
The props used in our film opening will be kept at a minimum. We have decided that Lucy’s and Alcione's characters will both have a pen and paper to give the effect of a real interview scene. On the table will be a small box, which we will be using as a voice recorder to record the interview between the three characters.
A table lamp will be used as the only source of light. We want to keep the room quite dimly lit to create suspense.
Locations
Our first location will be the music recording studio in our college. We chose this because the big space gives us an opportunity to transform it into an interview room, once all of the recording equipment is moved out of the way.
The other main location that we will be using is Duke Place and Duke Street in Castlefield. This is where the murder scene will take place.
Interrogation scene
The opening of the scene will be Lucy walking down the corridor and towards the door. During this scene, there will be a variety of camera shots, movements and angles. Different parts of her body will shown, all except her face. The camera will focus on her feet walking towards the door and then a shot from behind her. We want this to create suspense and anticipation without seeing her face until she is in the room. When Lucy reaches the door, she will open it and walk in. When she is in, the camera will be used as a security camera inside the room in a top corner. A green filter will be placed over the lens of the camera. A time and date will be placed in the left bottom corner whilst editing to achieve the full security camera effect. Lucy's character is going to be very angry because the victim was her sister. Her sister has been reported missing and she believes that the suspect knows where she is, though Lucy does not know that her sister is dead. As Lucy sits at the interview table her face is revealed to the camera. Shot reverse shot will be used showing Lucie at a low angle shot, suggesting that she has more status than any other characters. Lewis will be shown at a high angle.
Murder scene
This part of the film opening will take place in Castlefield between Duke Place and Duke Street. We are going to be using a series of shots as flashback scenes. Lewis will be doing a voice over narration during the flashback scenes, explaining what is going on. We are going to cut between the Castlefield scene and the interrogation scene at key points for effect. The victim is going to be walking down a path in Castlefield, oblivious to the fact that the murderer is following her. We will cut to the murderers point of view, following the victim down the path, watching her as she walks. The camera will be hand held at this point to create the effect of a point of view show from suspect. The camera will cut to the victim again showing the suspect running after her.
To create a good shot of the victim being attacked, the camera will be hand held and sharp, quick movements will be used. After the attack, the victim is then thrown into a ditch. Here we will cut back to the interrogation scene and we will see the suspect’s arrogant smirking face.
Tuesday, 8 February 2011
Analysis of Butterfly Effect- Opening Scene

Directed by Eric Bress & J. Mackye Gruber
Duration: 2:00 including credits
The opening scene of the film shows the protagonist Evan, looking into an office from the outside. He then kicks the door open and shuts it behind himself. He pushes a couch and puts it infront of the door to block anyone from getting in. He grabs a box and runs over to a desk. He grabs a pad and pen from the desk and hides underneath the desk. He begins to write a note on the pad. Evan reads the note out loud as he he writing. During the two minutes of the opening, there are 7 key shots.
The scene uses a variety of shots, such as tracking shots, close up, medium shot and high angle shot. The camera movement is fast paced and the cuts from shot to shot are quick. Slow, tense music builds up throughout, adding suspense to the scene.
The scene uses diegetic sound, such as; the crash of the door being kicked and the heavy breathing of the character, in order to make it more realistic.
The scene ends with a close up of the notepad which falls apart to reveal a butterfly and the title of the film, The Butterfly Effect. The scene then fades out.

The first screenshot shows a close up of Evan hiding under the desk. He looks desperate and scared. He is mumbling to himself as he writes the note. Evan looks shabby and doesn’t look like he takes care of his appearance. There is no lighting used in this shot. This is useful to the shot as it gives the scene a gloomy and grim appearence, allowing the audience to get a feel for the rest of the film. The soundtrack also adds to the atmosphere of the scene.

The second screenshot shows a high angle shot of Evan hiding under the desk. He is wrting in the notepad and looking rather anxious and nervous. Again the lighting is very low key. He is isolated in the room by his surroundings giving him a sense of vunerability. The angle of the shot also gives the idea that he is vunerable and weak. His attitude and behaviour sow that he is desperate and lonely.

The third screenshot shows an extreme close up of the notepad that Evan is writing in. It shows the two words ‘save her.’ At this point, the audience doesn’t know much about what is going on in the film and it is unknown who 'her' is. This is a very complex film as there is a lot of jumping back and forth in time to add confusion and suspense for the audience, meaning they have to work out who 'her' is.

The final shot of the film opening shows the title of the film. There are no opening credits establishing who is who in the film. This adds to the whole mystery of the film. Behind the title is an image of a butterfly, which is obviously linked to the title of film.
Subscribe to:
Posts (Atom)